ASUS Video
Security On-Line Help
Ī@
Video Security is a
very powerful video stream comparing and detecting software that
help users to find any potential errors at specific time interval
by using video capture device. (E.g. CCD, V8, digital Hi-8 ...etc.)
You can use Video Security to do the following:
If Video Security
detected any variation, it might be an error or not, but no
matter what Video Security will record:
Note: This log file is saved as "History.Log" and the ACCESS database file is saved as "WDog.mdb", they are put at working directory.
Besides data
processing, Video Security allow user to set the error
processing procedure while detecting any unusual condition,
now they are four options to select, see error processing
procedure to detail.
Under the limitation
of hardware sensibility, the Video Security may not completely
detect all possible errors. Before you execute Video Security,
there are some limitations you have to understand in order that
you can appropriately use it.
Video Security is
designed for all possible environments and to avoid all possible
error conditions, therefore you have to tune the parameters in Video
Security Setup Wizard to get the best detecting result.
Software:
Hardware:
Ī@
Ī@
Whenever executing
Setup Wizard, you can press <Cancel>
to exit or press <Finish> to
save the current setting or <Help>
to get on-line help. Setup Wizard will indicate how to set ASUS
Video Security step by step.
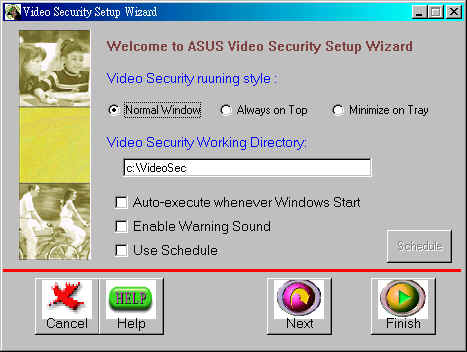
Video Security
running style :
There are three
options for selecting, Normal Window, Always On Top and
Minimize On Tray.
Normal Window is the
default option. If you select this option, Video Security will
work as a general window program.
Minimize On Tray is a
good option when you want to hide the main Video Security window,
(because you don't want anybody to know you are monitoring) it
will shrink as an icon and put on task bar. Whenever Video
Security detects any problem, it will pop up. You may also click
this icon to pop up main window anytime.
Always On Top is like
normal window, but the main window and control panel is shown
always on top. You may click mouse right button to enable/disable
"Always On Top" function at main window anytime.
Working
Directory :
Working directory is
a most important parameter for storing the Video Security's
temporal work files and log files. The default directory is "c:\VideoSec". You can
input any directory you like, but you must make sure that the
directory you assigned is valid and existing. If the working
directory you input does not exist, Setup Wizard will ask you to
create it, If you don't fix this problem, Setup Wizard will use
"c:\VideoSec" as
default automatically. When you execute Video Security, it will
automatically create a sub- working directory with current date
and time, (like "1999.9.30_12.30.20", it means that
Video Security was started at 1999/9/30 12:30:20), and all this
sub- working directory
Note : You should not change working directory while Video
Security is executing, this will result in a serious run time
error.
Auto-Execute
whenever Windows start:
Enabling this item,
Video Security will auto-execute whenever Windows starts. This
option is helpful when you use remote control for your computer.
Enable warning
sound:
Enabling warning
sound, Video Security will alarm user when Video Security detects
any unusual condition. But before you use this option, you must
make sure your PC has properly installed a soundcard.
Use Schedule:
Use schedule is a
very helpful option let user decide when to start Video Security
watchdog function, you may select how much time delay from now on
or at today's specific time to start it. The best use is when you
decide to start Video Security, but you don't want Video Security
detect you left, you may use this function.
Ī@
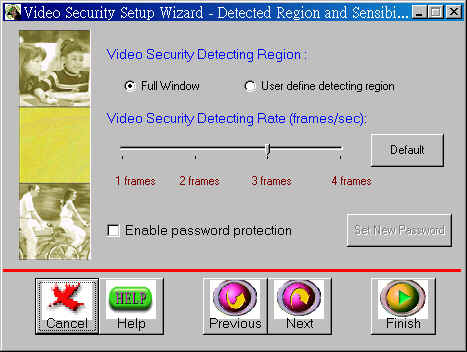
Video Security
Detecting region:
There are two options
for selecting, one is Normal Window, and the
other is User Define Detecting Region.
If you select Normal
Window, Video Security will detect all visible area
while watchdog function is executing.
If you select User
Define Detecting Region, Video Security will only detect
the specific region you set while watchdog function is executing,
but the setup work will be done when Video Security starts up
next time.
Note: Video Security
now only support 352*240 (NTSC) or 352*288 (PAL) resolution, If
your capture driver is set to another resolution, Video Security
will ask you to adjust to the default resolution.
Video Security
Detecting Rate:
Detecting rate is
Video Security detecting scan rate. There are four options, 1
frame/sec, 2 frame/sec, 3 frame/sec, and 4 frame/sec. The default
is 2 frames/sec. The more scan rate you select, the more accuracy
you get, but the more CPU usage you need. If you want to use
Video Security and other Applications (like Office, network)
execute simultaneously, you had better to decrease scan rate to
get more CPU usage for other Applications.
Note: This issue is
dependent on your CPU. If you use high level CPU like Pentium III,
you can ignore these problems above.
Enable Password
protection:
Video Security is a
very safe application. If you are the first user who installed
Video Security, you can get the authorized right to enable this
function. Once you enable password protection, no one can change
the settings under Setup Wizard besides you, and it will check
password whenever you start or stop Video Security watchdog
function, in addition you input the correct password.
Note: If you want to
be the only user of Video security, you must set password
protection when installing, but one thing you must know, when you
set password protection, the protection will not be released
until you disable the protection, even you uninstall and then re-install
Video Security.
Ī@

Video Security
Image processing type:
There is only one
option "Gray Level (8-bit)" now.
Note : Once Video
Security detected any unusual condition, it will save the last
two video stream snapshot as an one combined error bitmap file,
and it names "errorX.bmp" (X=1,2,3 represents the
current detected number), and store this bitmap files into the
current working directory. Video Security won't remove these
files from HD until user really wants to delete them, so you may
refer them anytime you want.
Video Security
Detecting sensibility:
Detecting sensibility
is a very important parameter for Video Security. Since
environment is so changeable, but we only care something change.
You must know all the view port you want to watch and guard,
therefore, you can tune a suitable sensibility to detect the
variation you want.
Ī@
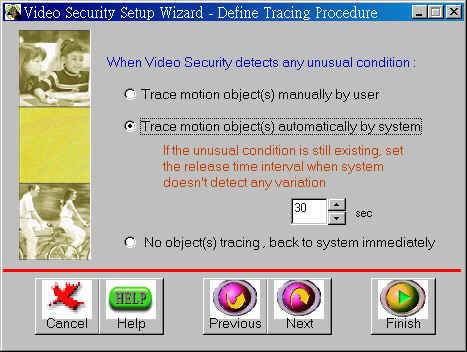
Video Security is not
only detect problem, it may trace the moving invader. There are
three options for tracing procedure.
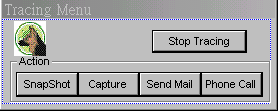 (Tracing Menu)
Ī@
Note: If you use Trace motion object(s) manually by user
option, all the video snapshot or capture file is saved at the
current working witch names "ManualX.Bmp" or "ManualX.Avi"
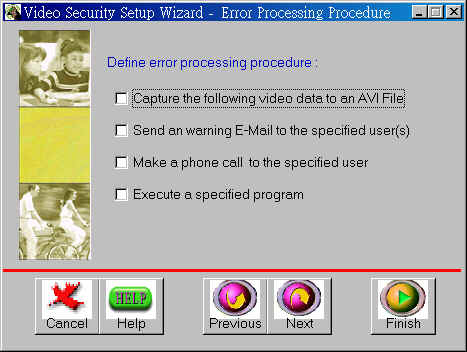
Now there are four
options for error processing procedure.
When you enable any
of these items, Setup Wizard will show the setting menu for these
items. See next.
Note : For phone call or E-Mail setting, user should take care
that whether the unusual situation frequently happens. If yes, it
will make the telephone line busy (phone call) or overuse the
bandwidth of network. (sending e-mail) Of course, it is not what
we desire.
Ī@
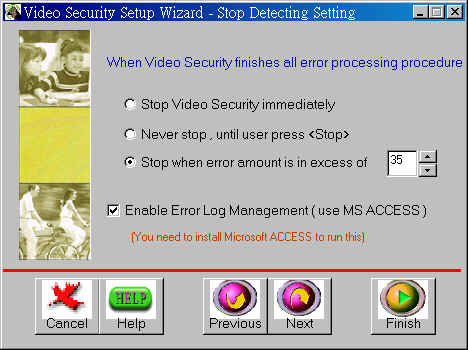
There are three
options to stop Video Security watchdog function
Ī@
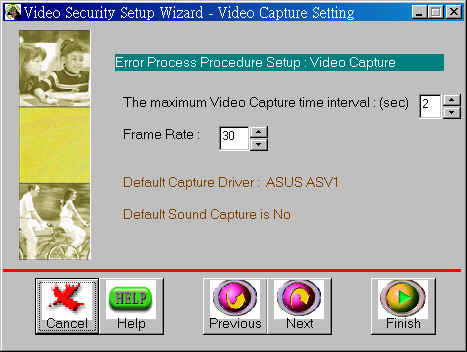
The maximum Video
Capture time interval is the video recording time and the default
value is 2 seconds, you may adjust this value.
Note:
Ī@
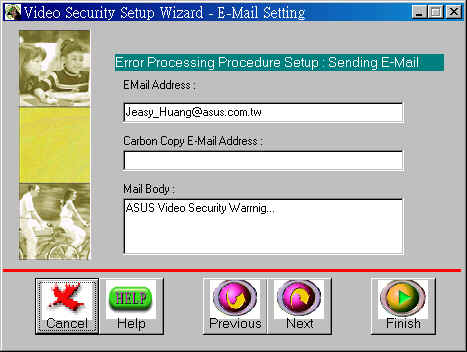
E-Mail Setting is
very simple; all you have to do is fill in the E-Mail Address
field with a proper and really existing e-mail address. The
Carbon Copy E-Mail Address and Mail Body are optional.
Ī@
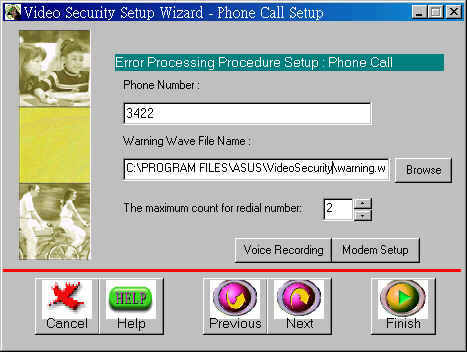
Phone Number:
You must fill Phone
Number field with a valid format (all digital number), users had
better test before using it.
Warning Wave File
Name:
Warning wave file is
played when user receives this warning call. You should make sure
the valid wave file is existing. The default wave file is "warning.wav"
bundle, and its message content is spoken by English.
Maximum count for
redial number:
When the remote terminator is no response, the Video Security repeatedly dial until reaching the maximum dial count.Ī@
Ī@
Execute specified
program setting:
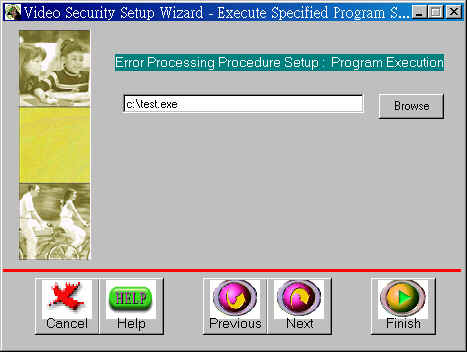
If you want to
execute a specified program immediately when Video Security
detected any unusual condition, (like another control program)
you may set this option. You must fill a valid execution program
filename, otherwise you will get an error message.
Ī@
To start Video
Security, it only clicks the Video Security icon on the Video
Security folder. But if you have set password protection, it will
prompt you input the valid password. If you give a wrong password
over three times. Sorry, Video Security will close. If you forget
the wrong password, sorry too, you may not enter Video Security
any more.
Ī@
Whenever you enter
Video Security, it will show a main control panel.(see below.)
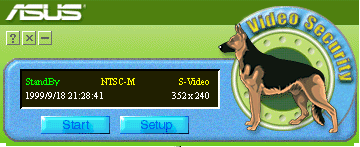
In the control panel,
it is very easy to use, you may find a message box and two
buttons, one is <Start/Stop> and another is <Setup>.
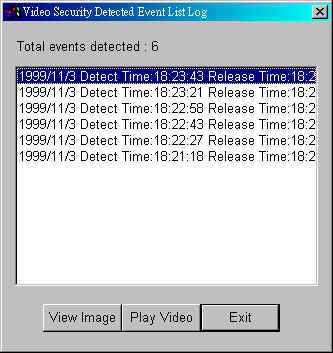
Click Start, Video Security will start detecting. When detecting
any error, the error log dialog will show up, you may click any
item you want to see the detecting results.
Video Security always
combines the last two errors into a bitmap file,
Video Security has
three states; they are Standby, Watchdog
and Tracing.
StandBy:
When Video Security
is in Standby State, it is waiting for your command. You may
press <Start> to begin detecting or press <Setup> to
set configuration about Video Security.
WatchDog:
When Video Security
is in watchdog state it means Video Security is detecting any
potential error, you may not use Setup function while Video
Security is in watchdog state,
Tracing:
Tracing state only
exists when you enable Tracing function (see Setup Wizard). If
Video Security is in tracing state, it tries to catch the motion
object(s), which make Video Security detect error.
Video Security has three setup modules: Setup Wizard,
Set Region and Video Source.

Setup Wizard :
It will call the
Setup Wizard program (wsetup.exe), so you must make sure wsetup.exe
exist in the same directory with Video Security program (VideoSecurity.exe),
otherwise you will get the error message. You can't run Setup
Wizard while Video Security is executing watchdog or tracing
function, and you must exit Setup Wizard to get the newest
current setting before you start watchdog function.
Set Region:
Video Security allows
users to define any view port on Video Security main window for
detecting, you may use mouse to drag a rectangular region you
want to detect (bypass outside the rectangle).
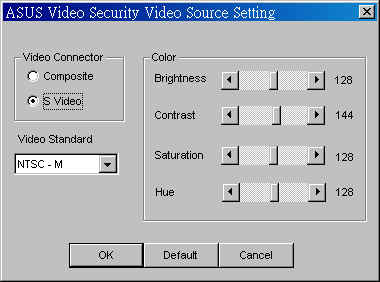
Video source
control:
Video source control
is a utility to adjust the video source parameters like
brightness, contrast, saturation and hue, change the Video
connector type, or the Video standard.
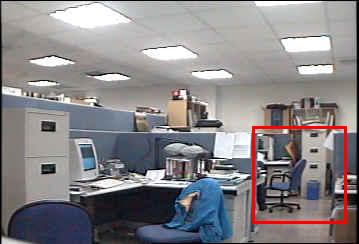
When Video Security detects any abnormal situation, it records
detecting date, time and other information. Then, store them at
file "History.Log". By the way, it prompts an error log
dialog box to let user to watch the detecting result.
You may press
Shortcut key <F4> to show this
dialog box if Video Security detected at least one error.
Shortcut keys mapping
Keystroke |
Actions |
| ESC | Exit from Video Security |
| F1 | On Line Help |
| F2 | Switch Video Security Start/Stop watchdog function |
| F3 | Setup Menu |
| F4 | Show Error Log Window |
Ī@
Q1: Does Video Security support USB CCD or IEEE 1394 CCD?
Ans: Sorry, Video
Security now only support S-Video or Composite CCDs, and they
must connect to ASUS Video Card.
Q2: Dose Video
Security check disk space while detecting?
Ans: This is a
very important issue when you decide use Video Security with
never stop option, you must be aware of whether the free space of
your HD is enough for storing temporal files in current working
directory. If HD space is exhausted, Video Security won't store
any information and give you a warning message.
Q3: If I forget the
password, how do I remove the password protection?
Ans: In fact, the
only way to release password protection is to recall the original
password you assign. The password protection is still active even
you uninstall Video Security.
Suggestions
E-Mail to Jeasy_Huang@asus.com.tw
Suggest for future versions of Video Security. We cannot
guarantee to reply all suggestions, but we will carefully
consider all ideas. We sincerely appreciate your input.