1.
To start Fdisk, type fdisk at the
command prompt, and then press ENTER.
2.
If you asked if you want to enable Large Disk
Support, press Y
3.
Press “5” to change the Fixed disk drive and
select the drive that has a nearest
size of your new drive (For example, 30 gig drive may show 29306mb
[10gig=10000mb estimated])
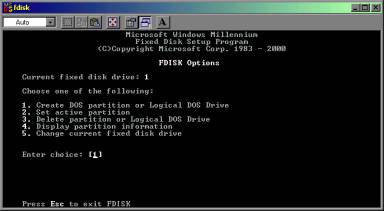
The portion “Current fixed disk drive:” must not be “1”, it must be the drive number of the drive kit.
4.
To create a new primary partition, at the
Fdisk Options screen, press 1 on your keyboard, press ENTER, press 1, and then
press ENTER.
When asked if you want to use the
maximum space (the entire drive), choose one of the two following options, and
then press ENTER:
a.
Y for Yes. Choose this if you don't
want to set up other drives on the hard disk. This uses the entire drive for a
partition. After you choose this option and press ENTER, Fdisk creates the
partition, and instructs you to restart and to press ESC to exit Fdisk. You are
finished partitioning and can go on to the next step.
NEXT STEP:
After boot up you will notice the new drive letter. Double click on the drive letter and Windows
will ask you to format the drive. Click yes to format the drive so it can be
useable.
b.
N for No. Choose this if you do want to
set up other drives on the hard disk. You can specify how large you want the
partition to be: either as a percentage of the hard disk's total capacity, or
in megabytes. After typing a value, press ENTER. Fdisk displays information
about the new primary partition. To return to the Fdisk Options screen, press
ESC.
c.
5.
To create an extended partition, at the Fdisk
Options screen, press 1 on your keyboard, press ENTER, press 2, and then press
ENTER.
Fdisk displays the maximum size that
the extended partition can be. We recommend that you use this maximum value,
because you can only create one extended partition. Any hard disk space you do
not assign to the extended partition cannot be accessed by a hard disk and,
consequently, by Windows ME.
6.
After you designate the size of the extended partition
and press ENTER, Fdisk immediately takes you either to the screen where you
create logical drives in the extended partition, or it displays information
about the extended and primary partitions. If it displays the partition
information, press ESC to get to the screen where you create logical drives.
The maximum available space in the extended partition is displayed both as a
percentage (100%) and megabytes. Follow the instructions on the screen to
divide up the space into one or more logical drives, pressing ENTER after
typing a percentage or megabyte quantity. Continue creating logical drives
until you have used up all the space in the extended partition. To return to
the Fdisk Options screen, press ESC.
7.
After you have created the partitions and
logical drives, at the Fdisk Options screen, press ESC. To exit Fdisk and
return to the command prompt, press ESC again. When you're at the command
prompt, you must turn off your computer for your partition changes to take
effect.
8.
You are now ready to format the drives you
created.
To FORMAT drives:
After boot up you will notice the new drive letter. Double click on the drive letter and Windows
will ask you to format the drive. Click yes to format the drive so it can be
useable.